This is default featured post 1 title

Go to Blogger edit html and find these sentences.Now replace these sentences with your own descriptions.This theme is Bloggerized by Lasantha Bandara - Premiumbloggertemplates.com.

This is default featured post 2 title

Go to Blogger edit html and find these sentences.Now replace these sentences with your own descriptions.This theme is Bloggerized by Lasantha Bandara - Premiumbloggertemplates.com.

This is default featured post 3 title

Go to Blogger edit html and find these sentences.Now replace these sentences with your own descriptions.This theme is Bloggerized by Lasantha Bandara - Premiumbloggertemplates.com.

This is default featured post 4 title

Go to Blogger edit html and find these sentences.Now replace these sentences with your own descriptions.This theme is Bloggerized by Lasantha Bandara - Premiumbloggertemplates.com.

This is default featured post 5 title

Go to Blogger edit html and find these sentences.Now replace these sentences with your own descriptions.This theme is Bloggerized by Lasantha Bandara - Premiumbloggertemplates.com.

Sabtu, 19 November 2011

Setting column width and row height in excel 2007 at centimeter (cm) or inci

Setting column width and row height In Excel 2007 at centimeter (cm) or inch

Default width 1 column in excel is 8,43. Unit for default column width is character (we don’t know more what is the meaning of character, but for while we can deem that 1 number is 1). So, default of 1 column width is 8,43 characters, so that in 1 column only include typed 8,43 characters, or we can say that 1 excel column only include 8 characters and for 9th character is not include completely in the column, please try to type 8 number characters, when we type 8 number characters still include in 1 column, and when we type 9th character is not include more. Like that approximately size for 8,43 characters.


As while for excel row height by default is 15. Unit for excel row height by default is point (pt). 1 pt approximately is 0,03533 cm.
Ok, Now how to change column width and row height at centimeter (cm) or inch? The manner is below:
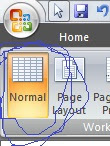
  1. Click on View tab


  2. Click on Page Layout

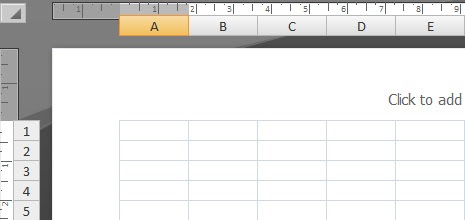
    and display of work sheet will change like below:
  3. Then, please change column width and row heigth as usually before, for this time column width unit and row height unit at centimeter (cm) or inch. For measurement at centimeter (cm), add “cm” after value entered and for measurement at inch, add “in” after value entered.
  4. And then, to back to before display, click on View tab (look at number 1), and click on Normal

Like that how to change column width and row height at centimeter (cm0 or inch, hope useful, if any doubt please send your question to sahabathypheninformasi@gmail.com, bye ^_^

Jumat, 29 April 2011

Make addition, substraction, multiplication and division Delphi program

To make addition, substraction, multiplication and division Delphi program is not difficult, if we have will to do it. OK, we will start to examine. First, make worksheet form like this below:

Basically, default name of edit text on right side of First number caption is edit1, erdit text on right side of Second number caption is edit2 and edit text on right side of Result is edit3. On this chance, we will change the name, we change edit1 with input1, edit2 with input2 and edit3 with output. Actually, no problem if we use default name without change them, however only to explain that edit1 is function as input1, edit2 is function as input2 and edit3 is function as output.

Now, we will start to write its syntax code. Depend on you, will which button start from between 4 button will be used. On this chance, we will just start from +(plus) button, then -(minus) button, then x(times) button and the last :(divided) button.

Don’t forget to save your file, at this chance we will save with name additon_and_multiplication, no problem with another name, only influence on syntax code or unit name, likely Delphi don’t allow the name with name which use space.

  1. Click on worksheet form, then double click on plus button, so that will show form code, and your cursor is between begin and end; and write there code below:
    a:=strtofloat(input1.text);
    b:=strtofloat(input2.text);
    c:=a+b;
    output.text:=floattostr(c);

    and formula for plus button have finished.
  2. Click again worksheet form, then double click on minus button, so that will show form code and your cursor still is between begin and end; and write there code below:
    a:=strtofloat(input1.text);
    b:=strtofloat(input2.text);
    c:=a-b;
    output.text:=floattostr(c);

  3. Click again worksheet form, then double click on times button, so that will show form code, and your cursor is between begin and end; and write there code below:
    a:=strtofloat(input1.text);
    b:=strtofloat(input2.text);
    c:=a*b;
    output.text:=floattostr(c);

  4. Click again worksheet form, then double click on divided button, so that will show form code, and your cursor is between begin and end; and write there code below:
    a:=strtofloat(input1.text);
    b:=strtofloat(input2.text);
    c:=a/b;
    output.text:=floattostr(c);

  5. Then, this time to declaration variables are used, are a, b and c variable. Move up your cursor until you find this code below:
    var
    Form1: TForm1;
    Implementation

  6. Then write code between Tform1; and Implementation.
    Ini kodenya:
    a,b,c:real;
  7. so that more complete code be like this:
    var
    Form1: TForm1;
    a,b,c:real;
    implementation

    Now try to click Run to run program and please test, like picture below:


That is sign of success to make a simple program with use Delphi, for friends is understandless, please ask to sahabat, if sahabat can, will help others
So, completely program syntax of this program is:

unit addition_and_multiplication;

interface

uses
Windows, Messages, SysUtils, Variants, Classes, Graphics, Controls, Forms,
Dialogs, StdCtrls;

type
TForm1 = class(TForm)
input1: TEdit;
Label1: TLabel;
Label2: TLabel;
Label3: TLabel;
input2: TEdit;
Label4: TLabel;
output: TEdit;
Label5: TLabel;
Button1: TButton;
Button2: TButton;
Button3: TButton;
Button4: TButton;
procedure Button1Click(Sender: TObject);
procedure Button2Click(Sender: TObject);
procedure Button3Click(Sender: TObject);
procedure Button4Click(Sender: TObject);
private
{ Private declarations }
public
{ Public declarations }
end;

var
Form1: TForm1;
a,b,c:real;
implementation

{$R *.dfm}

procedure TForm1.Button1Click(Sender: TObject);
begin
a:=strtofloat(input1.text);
b:=strtofloat(input2.text);
c:=a+b;
output.text:=floattostr(c);
end;

procedure TForm1.Button2Click(Sender: TObject);
begin
a:=strtofloat(input1.Text);
b:=strtofloat(input2.text);
c:=a-b;
output.Text:=floattostr(c);
end;

procedure TForm1.Button3Click(Sender: TObject);
begin
a:=strtofloat(input1.Text);
b:=strtofloat(input2.Text);
c:=a*b;
output.Text:=floattostr(c);
end;

procedure TForm1.Button4Click(Sender: TObject);
begin
a:=strtofloat(input1.text);
b:=strtofloat(input2.text);
c:=a/b;
output.text:=floattostr(c);
end;

end.


For friends who want to see example of application program is created by syntax above on Delphi can download it here and who want to download microsoft word file (.doc file) can download it here


All of truth come from God and faults are from me

Senin, 21 Maret 2011

Create a Windows 7 System Repair Disc

this posting is 100 % plagiarism from sevenforums.com, exactly is http://www.sevenforums.com/tutorials/2083-system-repair-disc-create.html, then why I did this? just for my note, so that I'm not difficult to search again in google.com. Thank you sevenforums.com, your article is useful for many people in the world, like me in Indonesia.

How to Create a Windows 7 System Repair Disc?


Information:
This will show you how to create a Windows 7 System Repair Disc to use to boot to the system recovery option if you don’t have a Windows installation disc, can’t find your Windows installation disc or can’t access the recovery options provided by your computer manufacturer.

EXAMPLE: System Recovery Options screen
NOTE: Using the System Repair Disc that you have created below, you can boot to the system recovery options screen below.


OPTION ONE

To Manually Create a "System Repair Disc" in Windows 7


NOTE: If you have a OEM Windows 7 instead of a retail Windows 7, then you may need to use OPTION TWO below to create a System Repair Disc with instead.
  1. Open Start Menu
    1. In the search line, type recdisc.exe and press Enter. (See screenshot below)
    2. Go to step 3.
    OR

  2. Open the Control Panel (All Items View), and click on the Backup and Restore icon
    1. Click on the Create a System recovery disc in the left blue pane. (See screenshot below)

  3. Insert a blank CD or DVD into your CD/DVD drive and click on the Create disc button. (See screenshot below)
  4. NOTE: If you are prompted to insert a Windows installation disc, it means that the files needed to create the system repair disc cannot be found on your computer. Insert a Windows 7 installation disc.


  5. It will now start creating the System Repair Disc. (See screenshot below)
  6. NOTE: If a AutoPlay window pops up, just close it.


  7. When it's finished, click on the Close button. (See screenshot below)


  8. Click on OK. (See screenshot below)


  9. Remove and label your new Windows 7 System Repair Disc from the CD/DVD drive.

OPTION TWO

To Create a "System Repair Disc" with a Download

NOTE: This option is perfect if you do not have a retail Windows 7 installation DVD and only have a OEM Windows 7 recovery DVD or partition.
  1. Click on the link below to download the same 32 bit (x86) or 64 bit ISO file as the 32-bit or 64-bit Windows 7 version you have installed.
    NOTE: This will be a torrent download. Be sure to read the instructions on how to download and use the torrent file at the site below.

  2. Follow the instructions at the site above to burn the ISO to a DVD disc.
    OR

  3. You can use the Windows 7 USB/DVD Download Tool to burn the ISO to a USB flash drive.

  4. You now have a Windows 7 System Repair Disc on a DVD or USB flash drive.

That's it,
Shawn